Steps I take after a fresh installation of a raspberry pi
My raspberry pi fresh installation
SSH
There are two options to do this. You can find the first way on the respective wiki page. We will handle the second way when we come to it.
Static IP Configuration
Always create a backup of your current network settings. Then, if something were to go wrong, at least you can go back to the previous settings.
sudo cp /etc/dhcpcd.conf /etc/dhcpcd.conf.backup
Setting a static IP address
The IP configuration of the network adapters is saved in the configuration file dhcpcd.conf in the /etc folder. Open the file with the nano editor:
sudo nano /etc/dhcpcd.conf
At the bottom of the file, add the following lines:
interface eth0static ip_address=192.168.1.30/24static routers=192.168.0.1static domain_name_servers=9.9.9.9
- Interface: use eth0 for the ethernet adapter and wlon0 for the wireless WIFI adapter.
- static ip_address: Fill in the IP address you would like, followed by a `/` en the subnet mask of your network. If you use 255.255.255.0, then you fill in `/24`. If you have a broader subnet mask like 255.255.0.0, you can use /16.
- static routers: Fill in the router's IP address (default gateway).
- static domain_name_servers: Here, you can fill in which DNS servers you want to use.
Once you have changed the file, save the adjustments with Ctrl + X, y, enter`.The changes will not be visible immediately. So you're probably better of restarting your raspberry pi at this point.
sudo reboot -h 0
After the restart, you can find the raspberry pi on the IP address you have configured.
Enable SSH using the GUI
- Click the raspberry logo at the top-left corner.
- Click the raspberry logo in the top-left corner.
- Select Preferences > Raspberry Pi Configuration.

- Navigate to the Interfaces tab in the configuration window.
- Enable SSH in the second line.
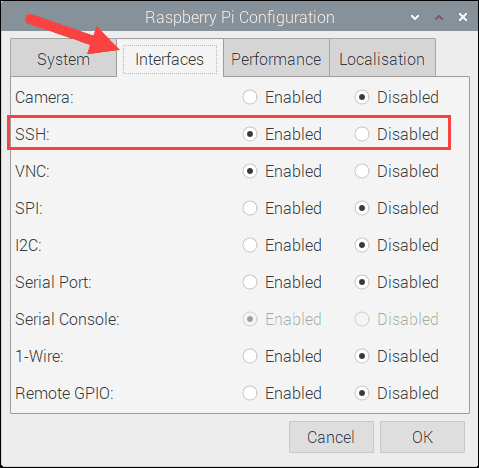
- Click ok to save the changes.
That's it. Your Raspberry Pi is now accessible via SSH. Ensure the device is connected to the internet before establishing an SSH session.